Introduction
As application security testers, we encounter scenarios where clients blacklist the default Burp Collaborator domains due to security and privacy concerns. Frequent enough that it warrants the configuration of a private Burp Collaborator server.
In this article, I will guide you through the process of configuring a private Burp Collaborator instance on an AWS Elastic Compute Cloud (EC2) instance while integrating Let’s Encrypt for SSL certificate security. I’ll conclude by validating the environment with a test in Burp Suite.
Let’s proceed!
Prerequisites
Before I begin, ensure you have the following prerequisites in place:
- AWS Account: You need an active Amazon Web Services (AWS) account.
- Hosted Zone in AWS Route 53: Your domain doesn’t need to be registered through AWS, but you need to manage DNS for the domain through Route 53.
- Burp Suite Professional: You’ll need the professional or enterprise version to run a collaborator instance.
Overview
For this tutorial, we will configure Burp Collaborator to run on a subdomain:
Domain: fatzombi.com
Subdomain: burp.fatzombi.com
To maintain transparency, redacted screenshots won’t be featured, except for masking my home IP address. The subdomain and EC2 instance will be terminated after publishing.
Disclaimer: Please be aware that using AWS Route 53 and EC2 services may result in charges. AWS pricing is usage-based, and data transfer costs, resource usage, and data storage can all contribute to your expenses. It is essential to monitor and manage your usage to avoid unexpected costs.
Launching an EC2 instance
This section guides you through setting up a new Amazon Elastic Compute Cloud (EC2) instance. This instance will serve as the foundation for your private Burp Collaborator setup.
- Log in to the AWS Management Console
- Search for EC2 under the compute section of the AWS services search bar.
- Click on Instances in the EC2 dashboard.
- Click on the Launch Instances button in the top-right corner of the Instances page.
Now you can define options for the EC2 VM.
Name: Burp Collaborator
Application and OS Images: Ubuntu 22.04 LTS 64-bit (x86)
Instance Type: t2.micro for the sake of this tutorial
Key pair (login): Select an existing key pair or click the Create new key pair button to upload the SSH key you’ll use to access the VM.
Network Settings, Storage, and Advanced Details: Defaults are fine for the sake of this tutorial.
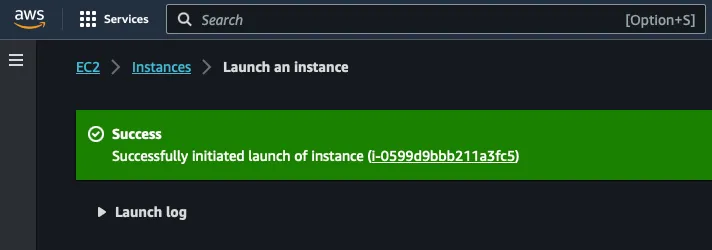
Click on Launch Instance, and within a few seconds, you can access the instance by clicking on the instance ID.

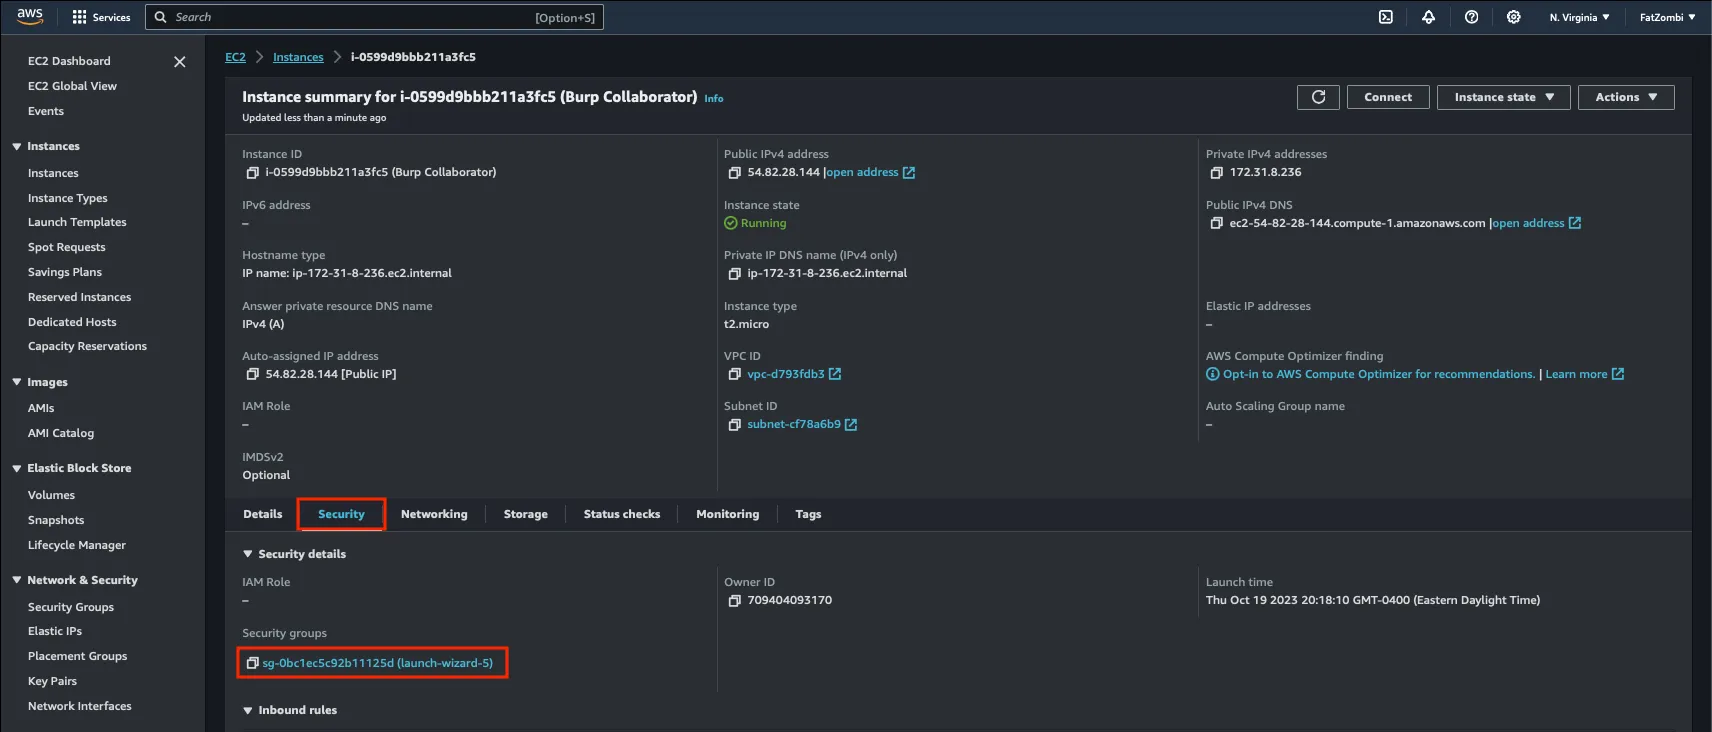
Make note of the Public IPv4 address and Private IPv4 addresses for Burp Collaborator and DNS configurations.

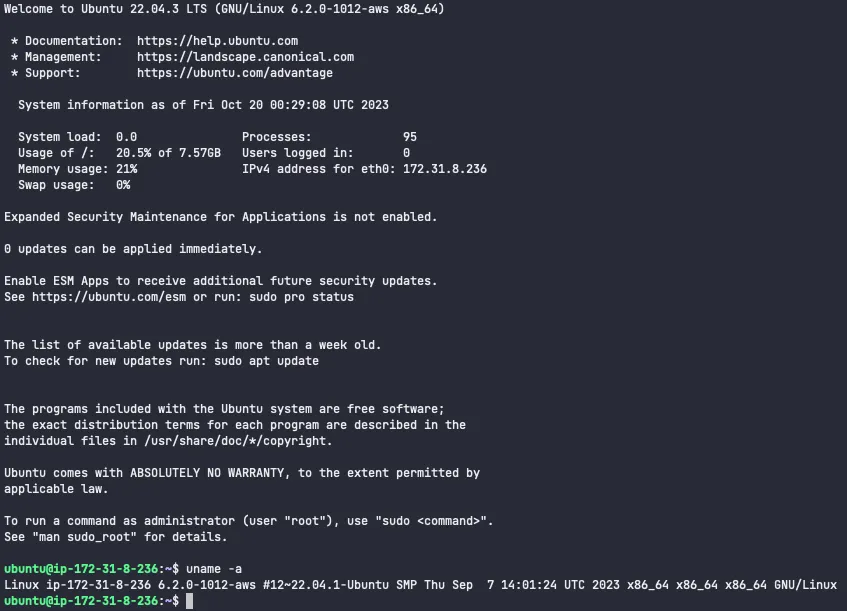
Since the configuration happens over SSH, confirm access to the VM via its Public IPv4 address.
ssh ubuntu@54.82.28.144
Configuring Inbound Ports to EC2
Burp Collaborator requires specific ports to be open on your EC2 VM. In the EC2 instance summary, navigate to the Security tab and click on the Security group.
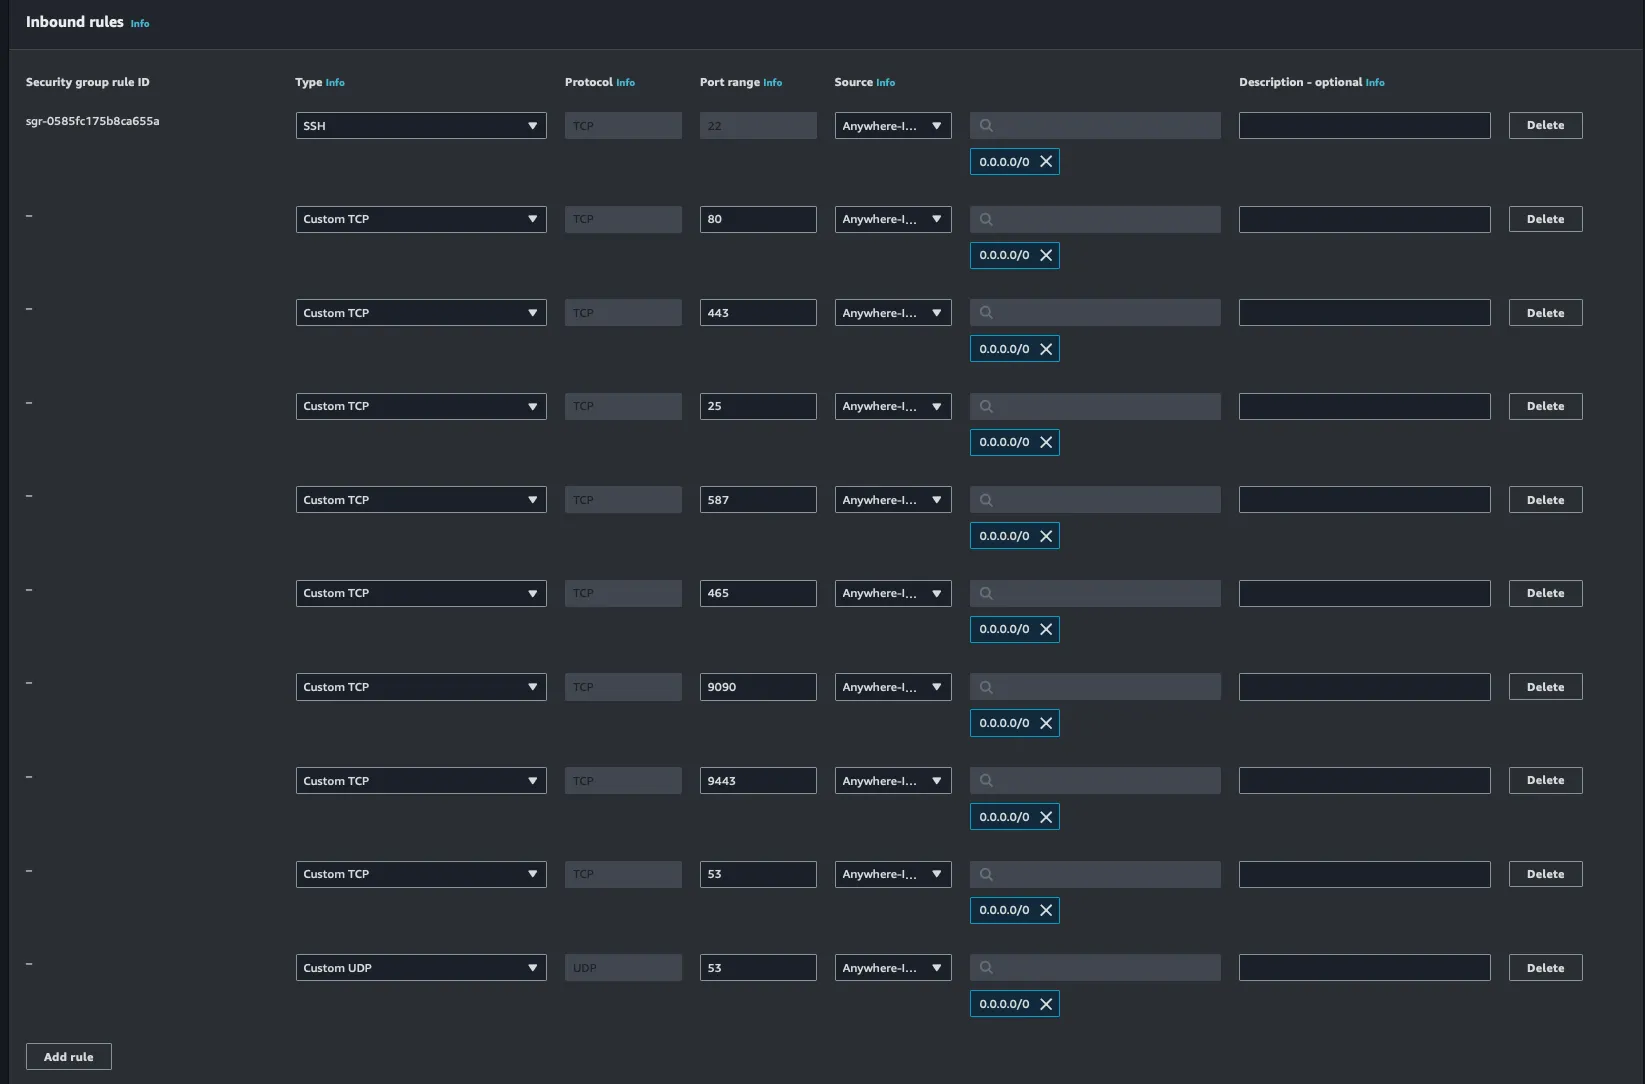
Clicking on the Edit inbound rules button will allow us to enter more rules than the default configuration. Add the following nine rules with a source of Anywhere-IPv4.
- TCP/80
- TCP/443
- TCP/25
- TCP/587
- TCP/465
- TCP/9090
- TCP/9443
- TCP/53
- UDP/53
Configuring DNS records with Route 53
As previously mentioned, we’re configuring Burp Collaborator to run on a subdomain.
Domain: fatzombi.com
Subdomain: burp.fatzombi.com
Access the Hosted Zone in the AWS Management Console for the domain.
Create an A record for burp.fatzombi.com pointing to the Public IPv4 address of your EC2 VM.
Click the Create record button under the hosted zone.
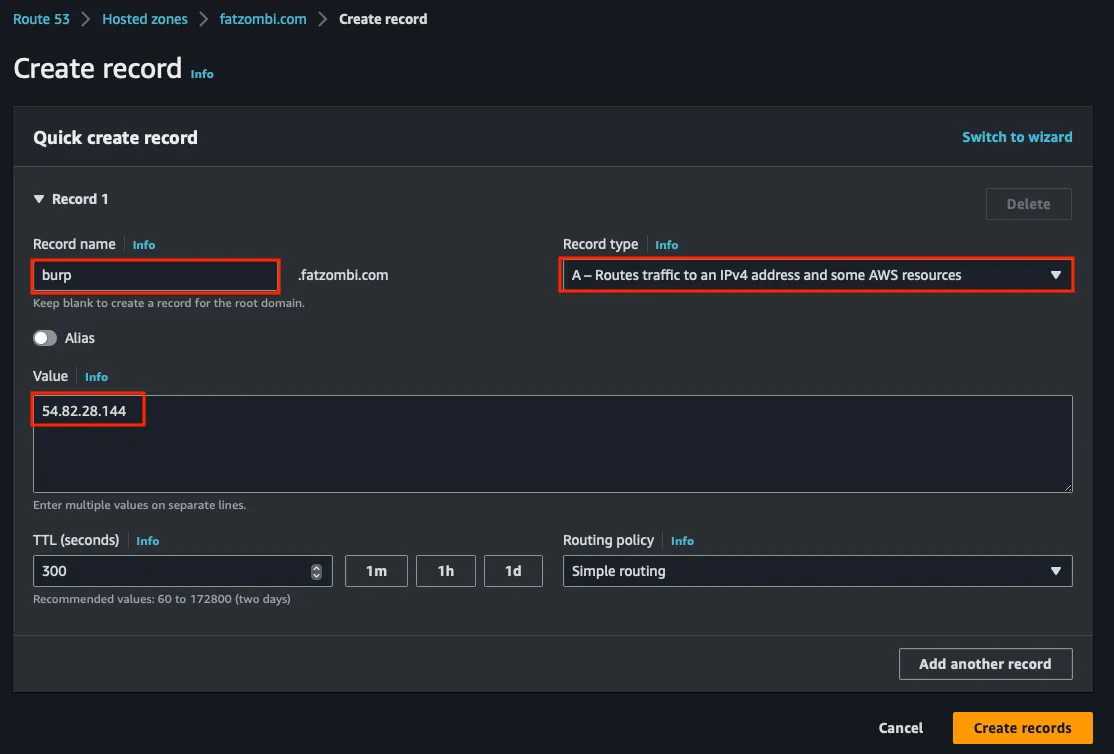
For now, that’s all the DNS records we need to add. We’ll add a TXT record in the next step, then an NS and A record in the following step; otherwise Let’s Encrypt won’t successfully generate the certificate.
To confirm DNS propagation, access your EC2 via its subdomain, bearing in mind that DNS propagation may take time. You can use a website such as WhatsMyDns.net to monitor the progress.
Configuring Let’s Encrypt SSL Certificate
To generate the Let’s Encrypt certificate, install certbot via snapd.
sudo apt update
sudo apt install snapd
sudo snap install certbot --classic
sudo ln -s /snap/bin/certbot /usr/bin/certbot
Generate a certificate, customizing the -m and -d parameters with your email address and domain respectively.
sudo certbot certonly -m phil@fatzombi.com \
-d "burp.fatzombi.com,*.burp.fatzombi.com" \
--server https://acme-v02.api.letsencrypt.org/directory \
--manual --agree-tos --no-eff-email --preferred-challenges dns-01
This command’s output will instruct you to create a DNS TXT record with a specific name and value.

Update Route 53 with this record. Set a low Time to Live (TTL) since you’ll be modifying this value.
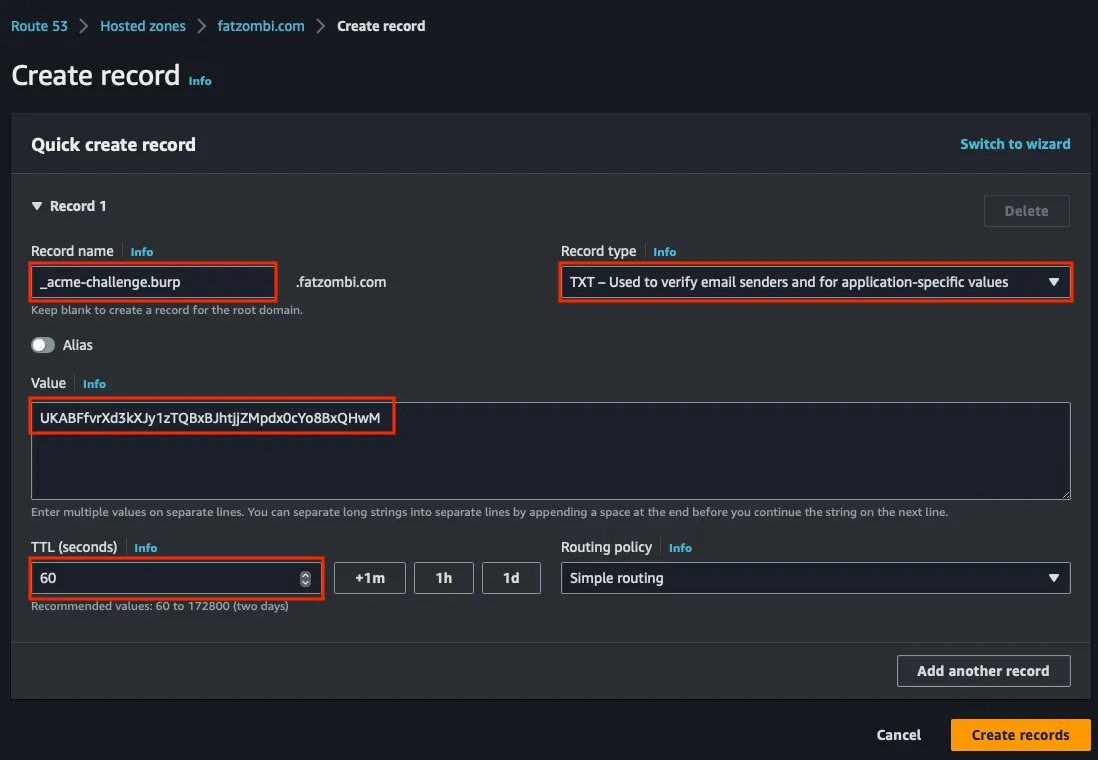
You’ll note that you don’t want to copy and paste the record name verbatim, or it will duplicate your domain suffix and Let’s Encrypt won’t detect the record.
Wait a few minutes or use a tool such as Dig under the Google Admin Toolbox to validate the TXT record, which returns the value you just created.
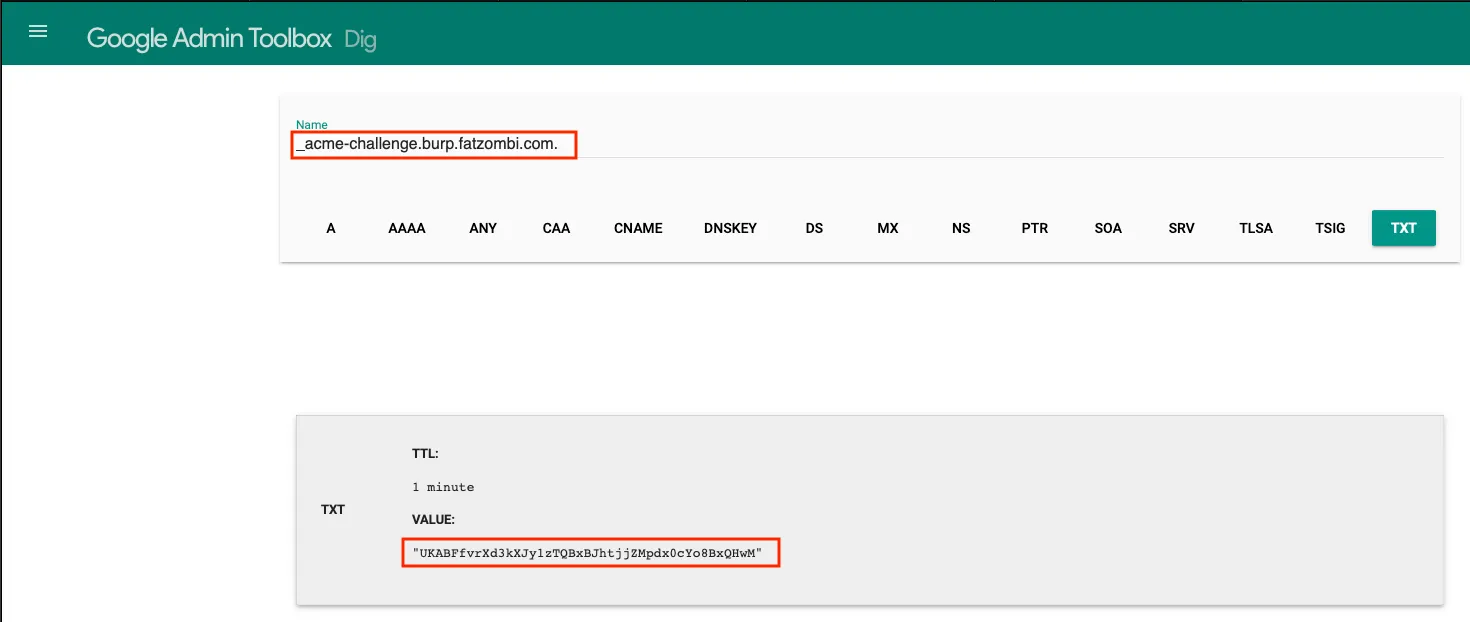
At this point, click Enter in your terminal, where you’ll be prompted to enter another DNS TXT record.
However, it’ll have the same record name, but we can’t add two records with the same name.
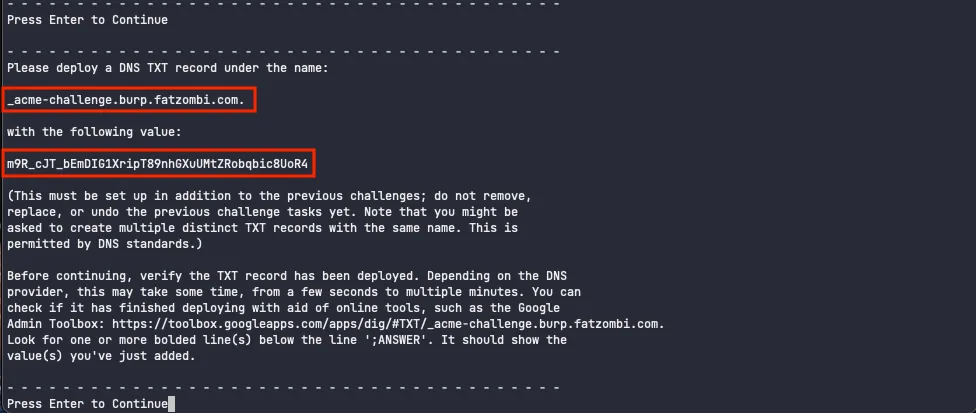
What you need to do is edit the existing TXT record and add the additional value on a new line. Make sure the values are separated by a line break, or the validation will fail.
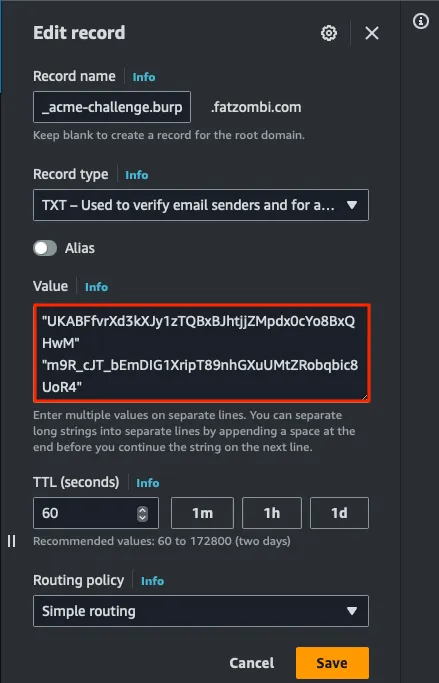
Confirm both values are present using a tool like the Google Admin Toolbox.
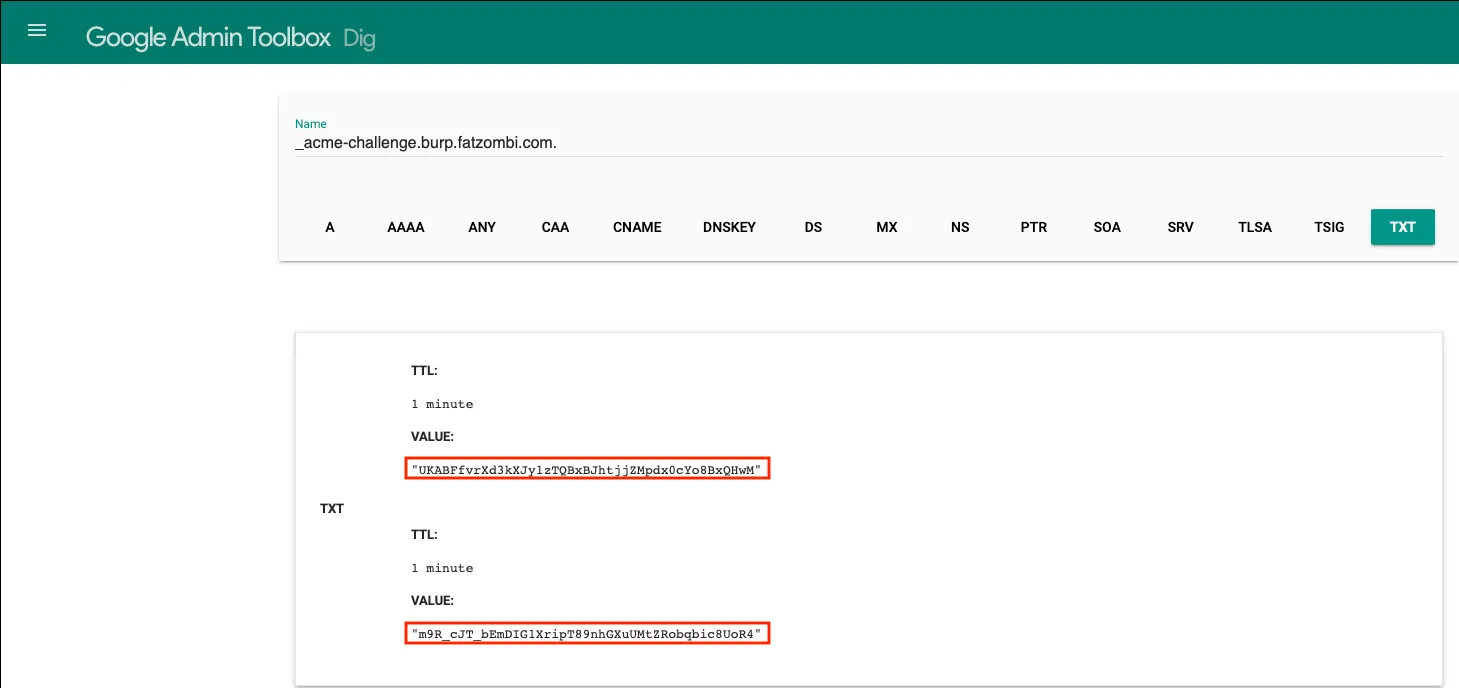
With these steps complete, you should have a certificate and key file saved to your system.

Allow Collaborator to be Authoritative for your subdomain
Burp Collaborator will generate random subdomains under your domain. To enable this, set the Collaborator server as authoritative for the subdomain.
Add two records to your hosted zone in Route 53:
NS record: Ensures that queries for the subdomain are resolved by your collaborator server.
A record: Resolves your name server to the Public IPv4 address of your collaborator server.
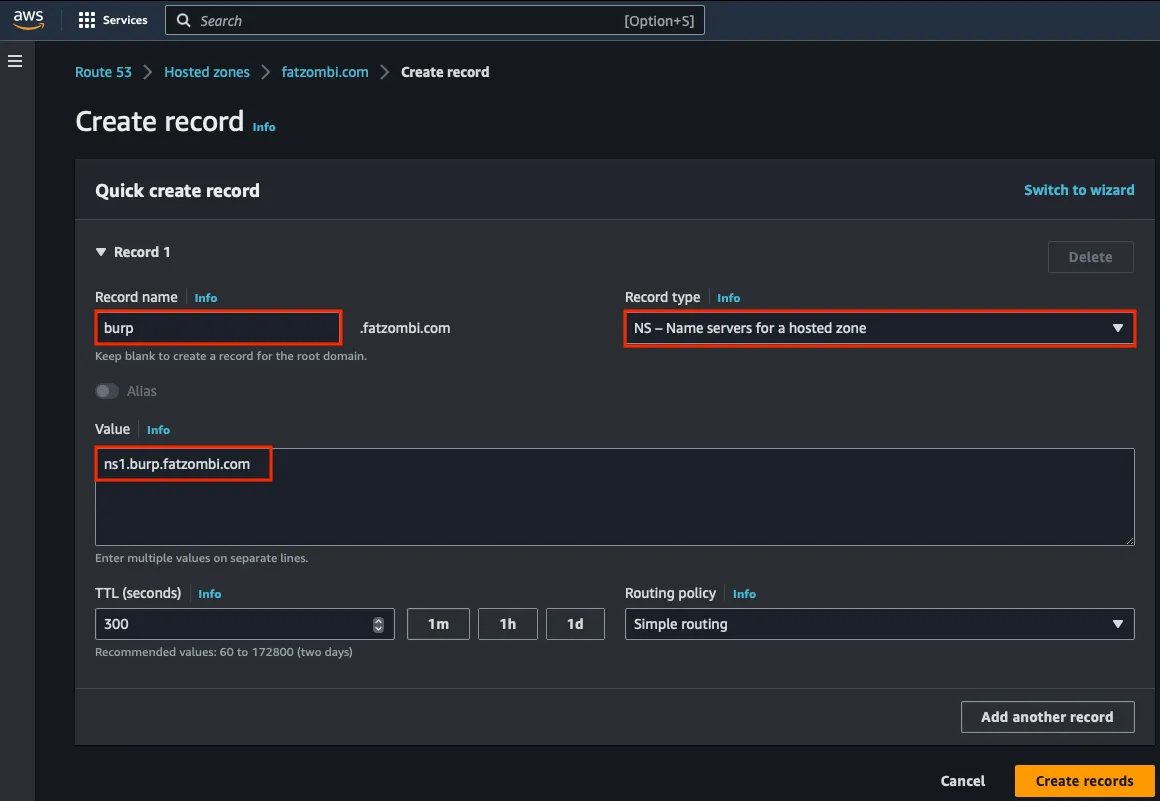
The next record will ensure that ns1.burp.fatzombi.com resolves to your EC2 server.
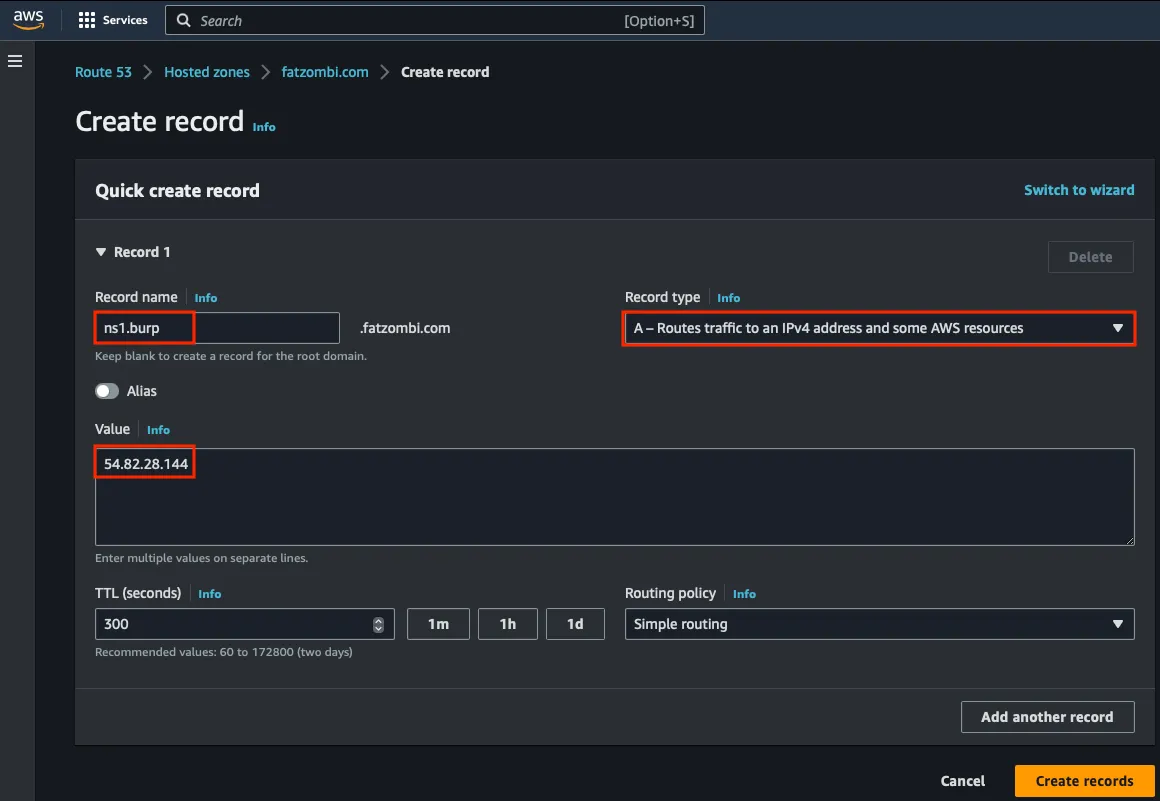
Install, Configure, and Run Burp Collaborator
At this stage, with all your DNS records configured, it’s time to install, configure, and run Burp Collaborator.
Installing Burp Suite Professional
Log in to your PortSwigger dashboard and download the Linux version of Burp Suite.

Transfer the file to your EC2:
scp burpsuite_pro_linux_v2023_10_2_2.sh ubuntu@54.82.28.144:/home/ubuntu/
Return to your EC2 VM and make the file executable:
sudo chmod u+x burpsuite_pro_linux_v2023_10_2_2.sh
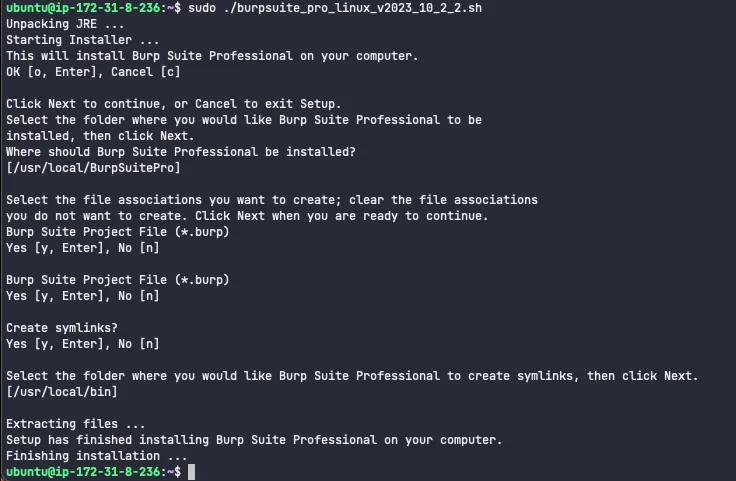
Now, proceed to install Burp Suite, which mainly involves accepting the default prompts:
sudo ./burpsuite_pro_linux_v2023_10_2_2.sh
Configuring Collaborator
For storing your configuration and miscellaneous files, create a directory under /usr/local/collaborator.
sudo mkdir /usr/local/collaborator
cd /usr/local/collaborator
Contents of collaborator.config
I won’t delve into the details of the configuration, as PortSwigger provides the collaborator.config example with comprehensive property explanations. However, the values you need to modify are as follows:
- serverDomain
- eventCapture.localAddress
- eventCapture.publicAddress
- eventCapture.ssl.certificateFiles
- poling.localAddress
- polling.publicAddress
- polling.ssl.certificateFiles
- dns.interfaces.name
- dns.interfaces.localAddress
- dns.interfaces.publicAddress
Save the file with the contents under /usr/local/collaborator/collaborator.config.
{
    "serverDomain": "burp.fatzombi.com",
    "workerThreads": 10,
    "eventCapture": {
        "localAddress": "172.31.8.236",
        "publicAddress": "54.82.28.144",
        "http": {
            "ports": 80
        },
        "https": {
            "ports": 443
        },
        "smtp": {
            "ports": [
                25,
                587
            ]
        },
        "smtps": {
            "ports": 465
        },
        "ssl": {
            "certificateFiles": [
                "/etc/letsencrypt/live/burp.fatzombi.com/privkey.pem",
                "/etc/letsencrypt/live/burp.fatzombi.com/cert.pem",
                "/etc/letsencrypt/live/burp.fatzombi.com/fullchain.pem"
            ]
        }
    },
    "polling": {
        "localAddress": "172.31.8.236",
        "publicAddress": "54.82.28.144",
        "http": {
            "port": 9090
        },
        "https": {
            "port": 9443
        },
        "ssl": {
            "certificateFiles": [
                "/etc/letsencrypt/live/burp.fatzombi.com/privkey.pem",
                "/etc/letsencrypt/live/burp.fatzombi.com/cert.pem",
                "/etc/letsencrypt/live/burp.fatzombi.com/fullchain.pem"
            ]
        }
    },
    "metrics": {
        "path": "metrics-ss",
    },
    "dns": {
        "interfaces": [
            {
            "name": "ns1.burp.fatzombi.com",
            "localAddress": "172.31.8.236",
            "publicAddress": "54.82.28.144"
            }
        ],
        "ports": 53
    },
    "logLevel": "INFO"
}
Running Collaborator
With a working configuration, you can now launch Collaborator.
/usr/local/BurpSuitePro/BurpSuitePro -Xmx200m --collaborator-server --collaborator-config=/usr/local/collaborator/collaborator.config

Testing with Burp Suite
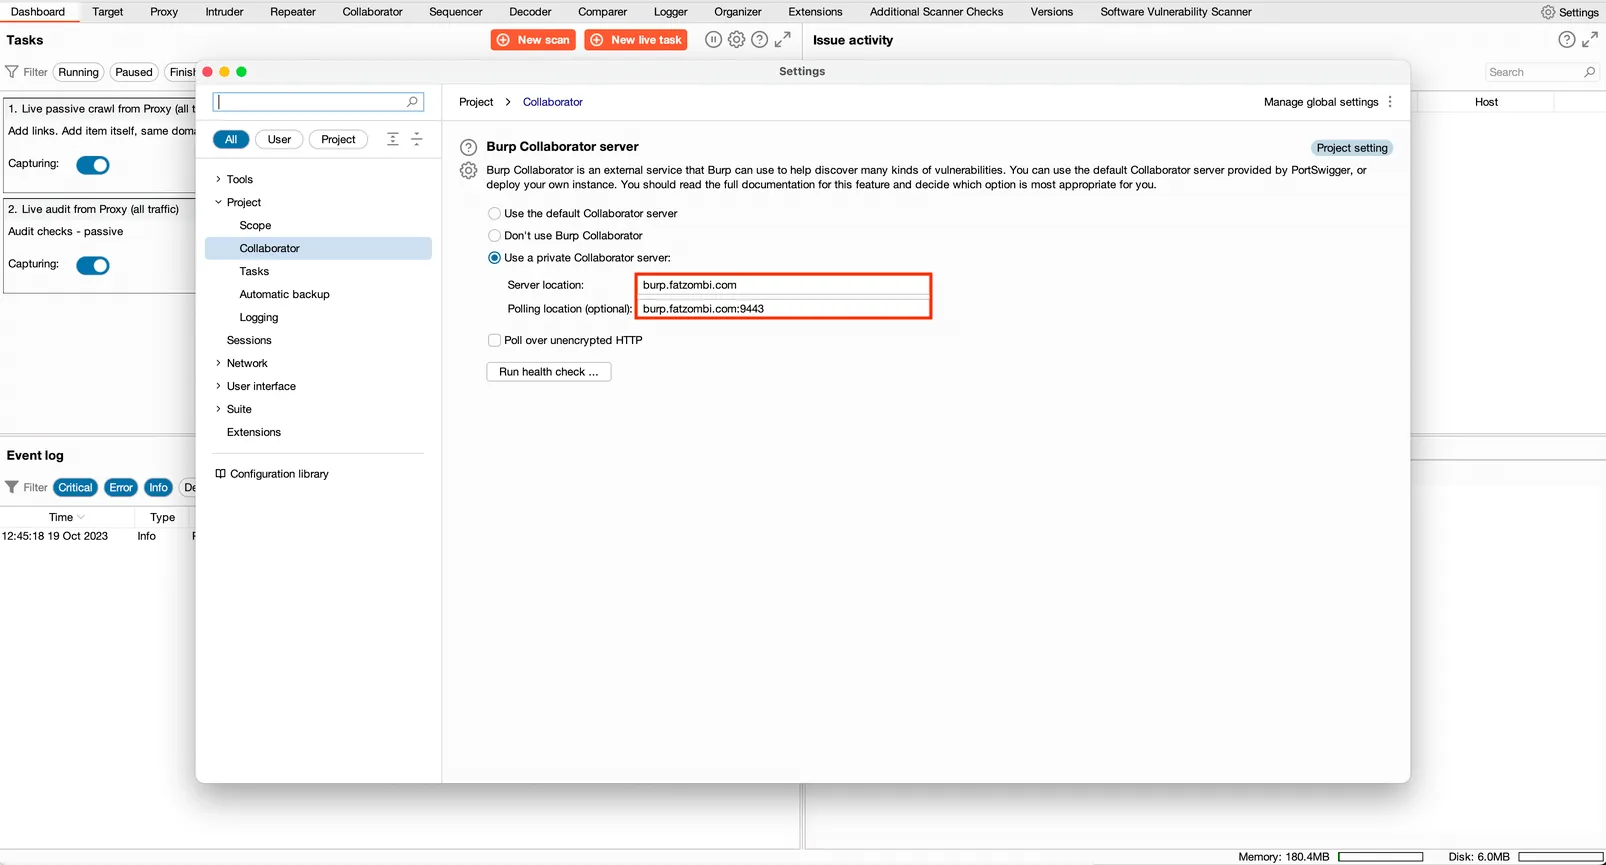
Return to your desktop, launch Burp Suite Professional, and navigate to the Collaborator tab under Settings -> Project. Modify the Server Location and Polling location, noting that the latter includes port 9443.
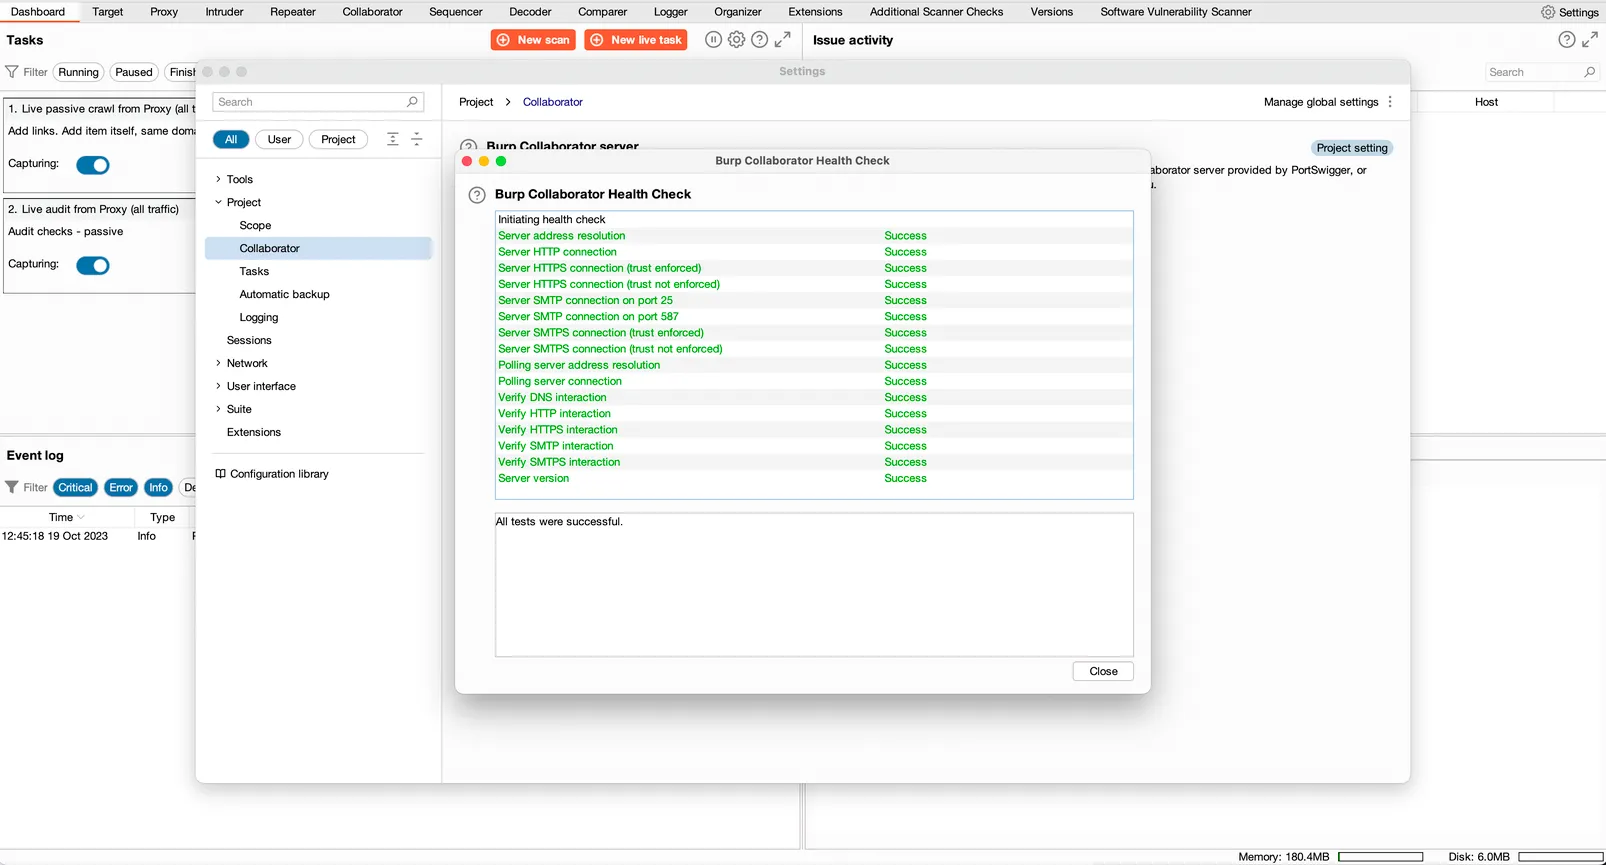
Click the Run health check… button to verify your setup, you should observe a series of green successes.
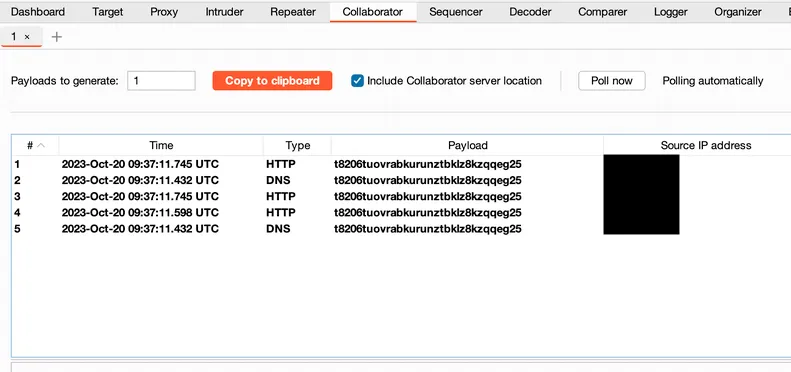
Send a payload containing the Collaborator-generated URL, and we can see the HTTP and DNS requests in the Collaborator tab.
Taking it further
As of now, your Burp Collaborator is operational, but you can take additional steps:
- Create a service file for systemd to ensure Burp Collaborator starts on boot.
- Set up an Elastic IP on the EC2 VM to prevent changes in your Public IPv4 address during reboots.
- Configure a cronjob for Let’s Encrypt certificate renewal.
- Run Collaborator as a lower-privileged user instead of root.
Conclusion
In the world of application security testing, the ability to adapt to the unique requirements and constraints of your clients is a hallmark of a skilled tester. Often, this means dealing with clients who have stringent security policies that necessitate bypassing default settings, such as the use of the standard Burp Collaborator domains.
Through this tutorial, I’ve equipped you with the knowledge to overcome such challenges and create a private and secure Burp Collaborator on an Amazon Elastic Compute Cloud (EC2) instance within AWS.
Now, it’s your turn to strengthen your cybersecurity arsenal and enhance the security posture of the web applications you assess. Embrace the power of a private Burp Collaborator, and lead the charge in securing the digital world, one application at a time.
Happy testing!