In this tutorial, we will configure a static website using Jekyll, GitHub Actions, AWS S3, AWS Route 53, AWS Certificate Manager, AWS CloudFront, and AWS CloudFormation. And yes, that sounds like a mouthful, but trust me, it’s not as intimidating as it sounds.
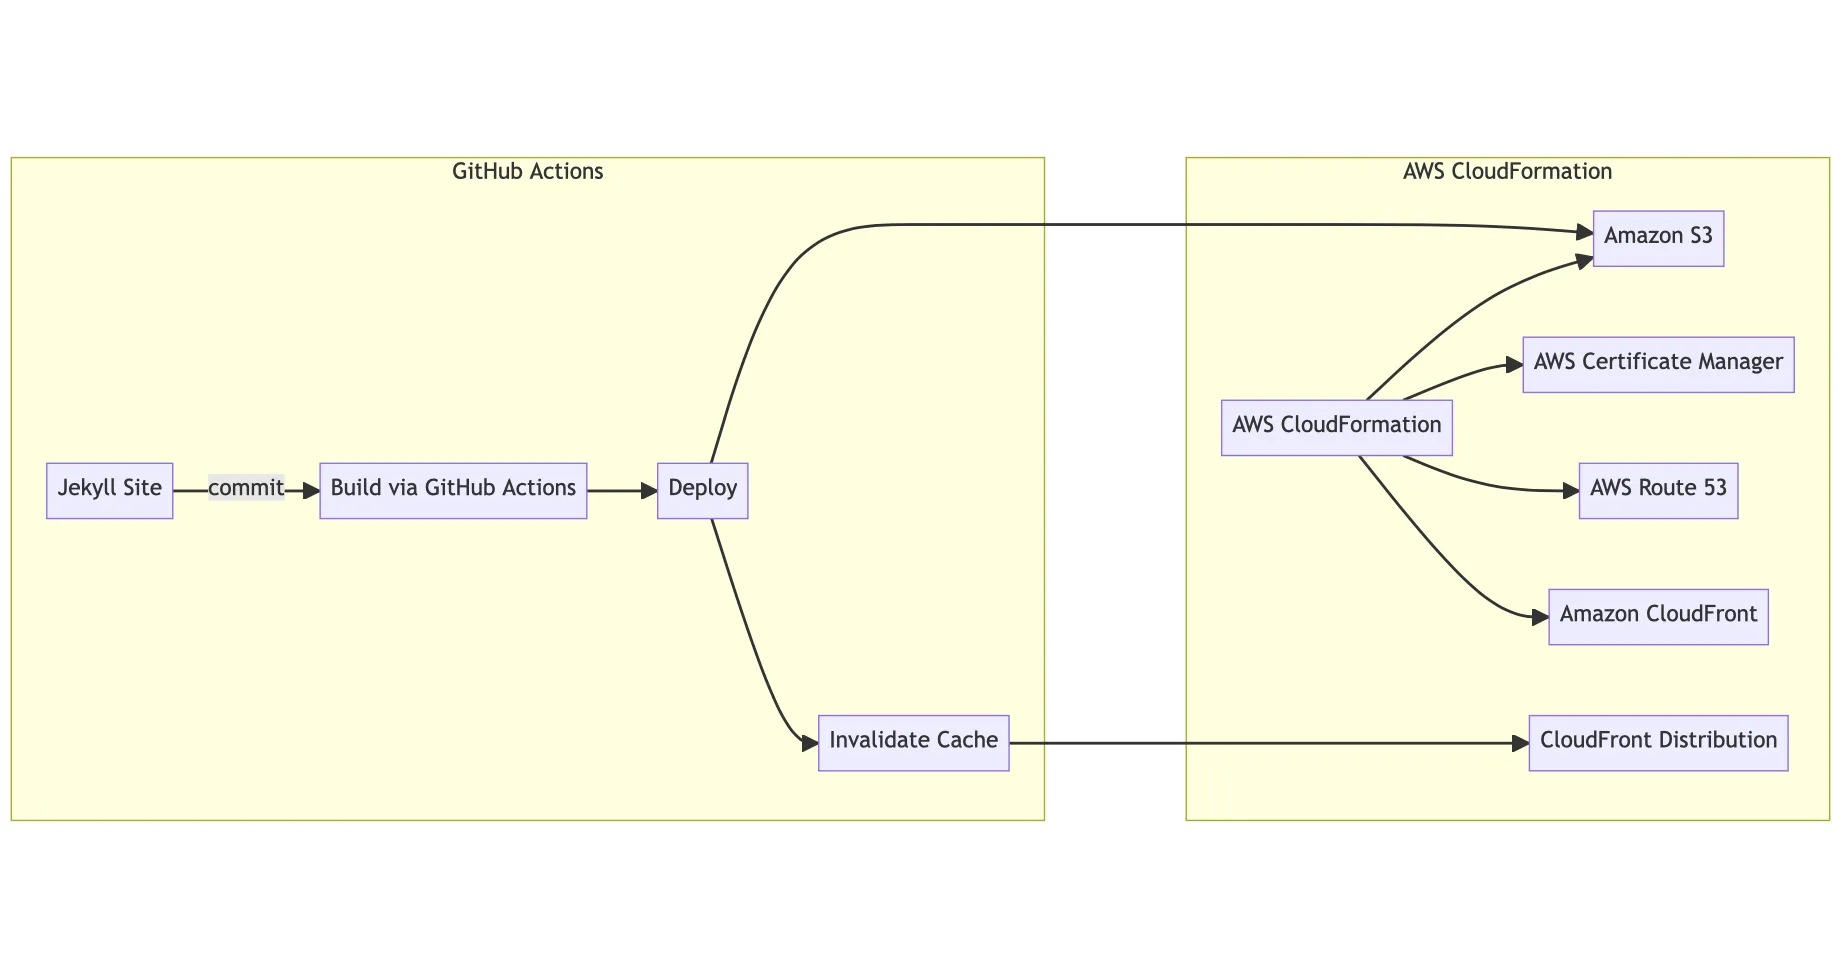
To begin, we’ll highlight the main technologies being used and the role they play in our solution.
Next, I’ll dive into the roles of each AWS offering used in this architecture, including how CloudFormation is used to create and manage the infrastructure for our website, how Route 53 and Certificate Manager are used to manage our domain, DNS records, and TLS certificates, and how CloudFront will be used for content delivery and caching.
Lastly, I’ll discuss how GitHub Actions are used to trigger the workflows in AWS that deploy updates to our website.
Solution Overview

Setting up AWS CloudFormation
AWS CloudFormation is a powerful service that allows you to create and manage your infrastructure as code. Using CloudFormation, we can define our infrastructure using templates written in either JSON or YAML, then we can create and update those resources using awscli or AWS Management Console. If you are familiar with docker-compose, this may be familiar to you.
In our solution, we are using AWS S3, Route 53, CloudFront, and Certificate Manager. These are all the resources that we will define in our YAML template, which our stack will be composed of.
CloudFormation Stack Template
# website-stack.yml
Parameters:
  DomainName:
    Description: The domain of the website
    Type: String

Resources:
  HostedZone:
    Type: AWS::Route53::HostedZone
    Properties:
      Name: !Ref DomainName
      HostedZoneConfig:
        Comment: Managed by CloudFormation

  WebsiteBucket:
    Type: AWS::S3::Bucket
    Properties:
      BucketName: !Ref DomainName
      WebsiteConfiguration:
        IndexDocument: index.html
        ErrorDocument: error.html

  Certificate:
    Type: AWS::CertificateManager::Certificate
    DependsOn: HostedZone
    Properties:
      DomainName: !Ref DomainName
      SubjectAlternativeNames:
      - !Sub 'www.${DomainName}'
      ValidationMethod: DNS
      DomainValidationOptions:
        - DomainName: !Ref DomainName
          HostedZoneId: !Ref HostedZone
        - DomainName: !Sub 'www.${DomainName}'
          HostedZoneId: !Ref HostedZone

  Distribution:
    Type: AWS::CloudFront::Distribution
    Properties:
      DistributionConfig:
        Aliases:
        - !Ref DomainName
        - www.!Ref DomainName
        Origins:
        - DomainName: !Sub '${WebsiteBucket}.s3.amazonaws.com'
          Id: S3Origin
          S3OriginConfig:
            OriginAccessIdentity: !Sub 'origin-access-identity/cloudfront/${WebsiteBucket}'
        DefaultCacheBehavior:
          TargetOriginId: S3Origin
          ViewerProtocolPolicy: redirect-to-https
          Compress: true
          ForwardedValues:
            QueryString: false
        ViewerCertificate:
          AcmCertificateArn: !Ref Certificate
          SslSupportMethod: sni-only

  RecordSetGroup:
    Type: AWS::Route53::RecordSetGroup
    Properties:
      HostedZoneId: !Ref HostedZone
      RecordSets:
      - Name: !Ref DomainName
        Type: A
        AliasTarget:
          HostedZoneId: Z2FDTNDATAQYW2
          DNSName: !GetAtt Distribution.DomainName
      - Name: !Sub 'www.${DomainName}'
        Type: CNAME
        ResourceRecords:
        - !GetAtt Distribution.DomainName
The CloudFormation template creates the five resources we mentioned above:
- A Route53 Hosted Zone, which will be used to store the DNS records for our domain.
- A S3 bucket called
example.comthat will contain the files for our Jekyll site. We are configuring the bucket as a static website, with an IndexDocument ofindex.htmland an ErrorDocument oferror.html. - A Certificate Manager certificate that will be used to secure our website with TLS. This certificate will be valid whether a user enters example.com or www.example.com to access our website.
- A CloudFront distribution that points to our S3 bucket and supports both
example.comandwww.example.com. - A RecordSetGroup which creates the DNS A and CNAME records required to map our domain to the CloudFront distribution, which in turn points to our S3 bucket which contains our static website.
Now that we have the contents of our CloudFormation stack, save it to your file system. Go over to AWS Management Console and search for the CloudFormation product.

Deploying the stack
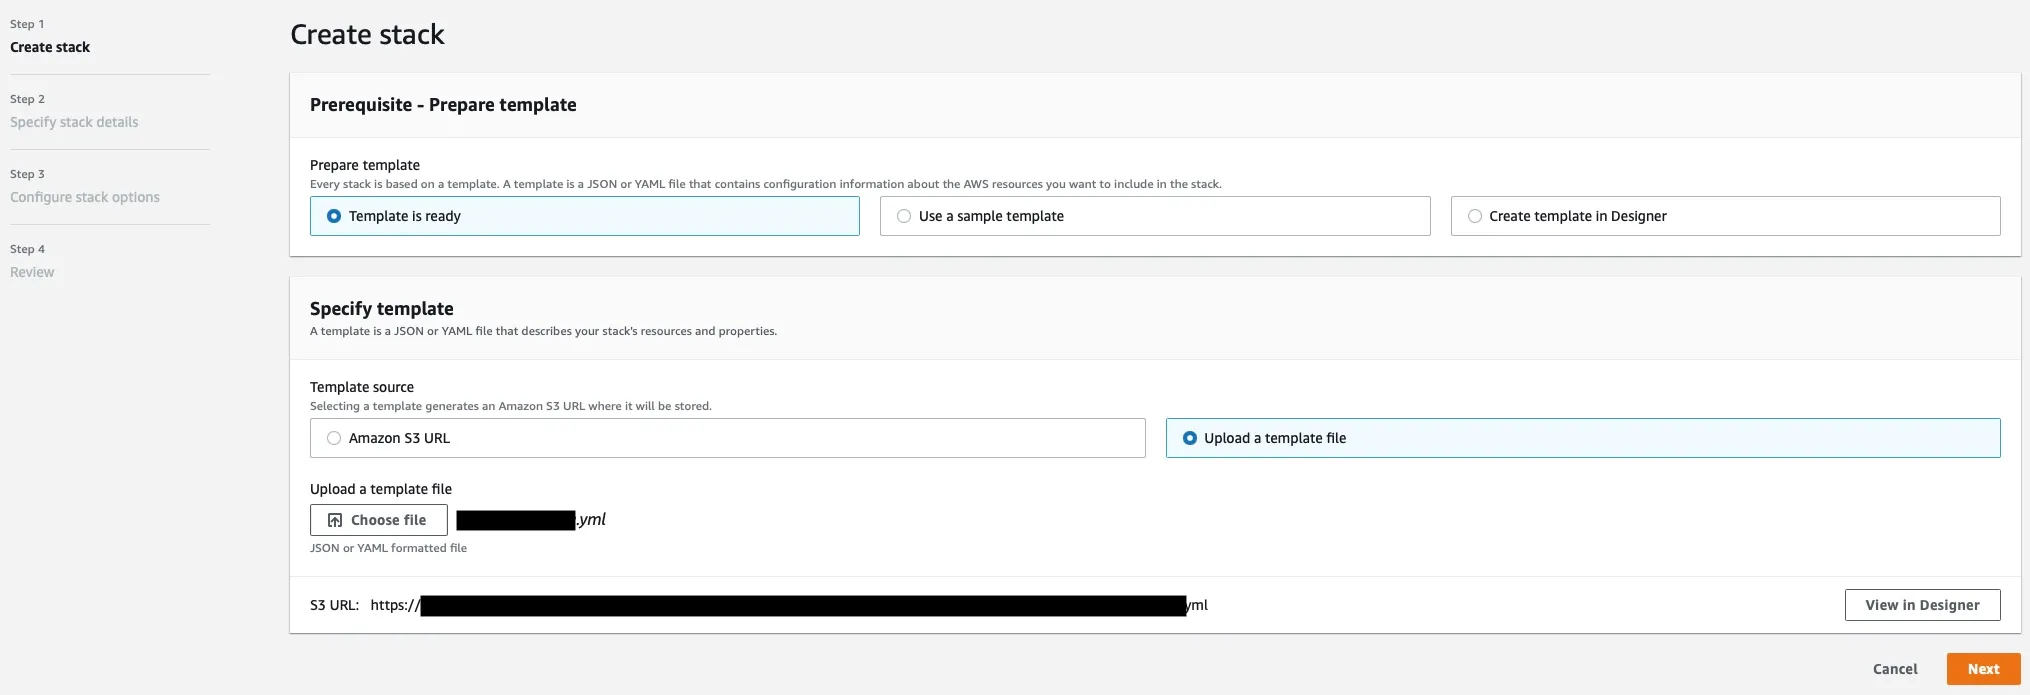
Click on Create stack and upload the YAML file as our template.

Click on Next, name our stack however you’d like and enter your domain name. Then click Next, Next, then Submit.
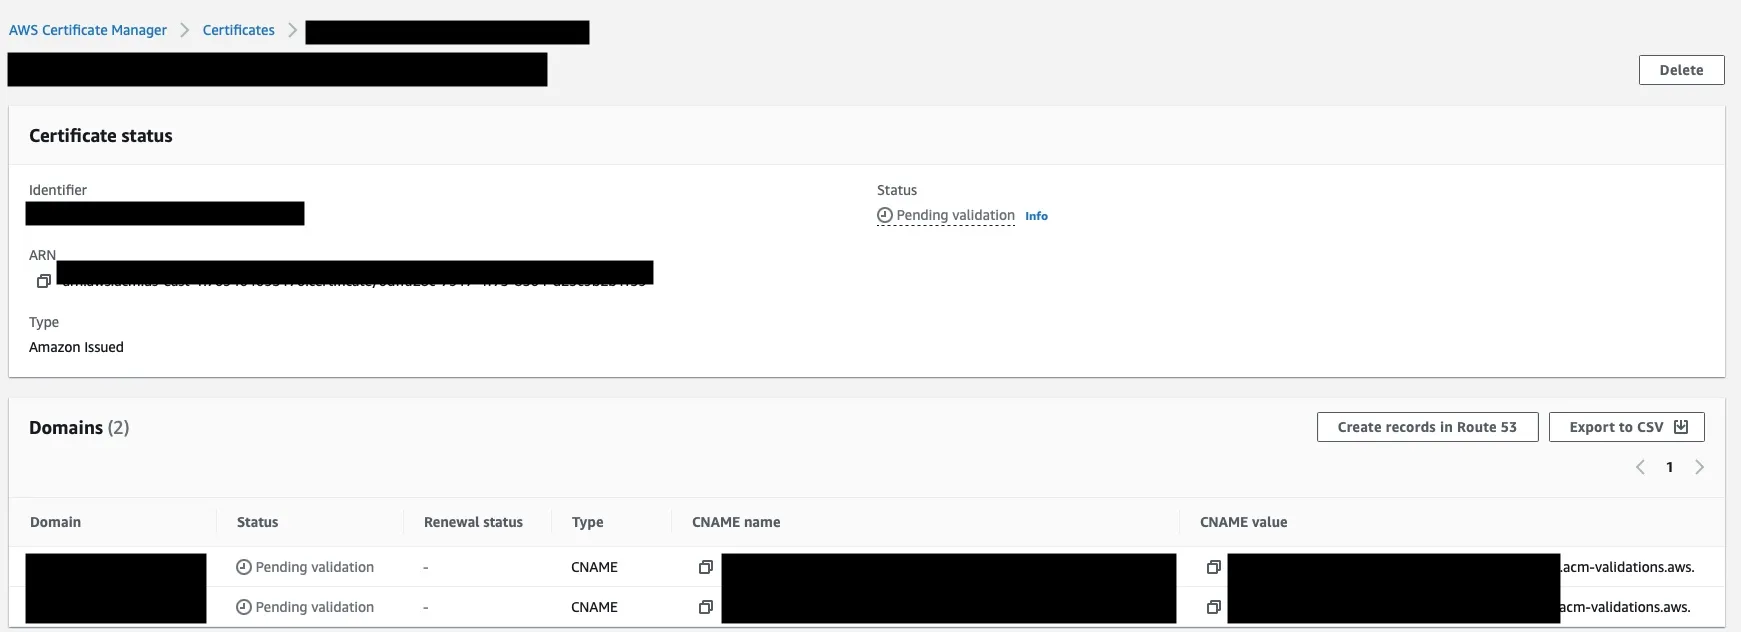
Now we can monitor the Events tab to check the progress of the resources CloudFormation is creating. The majority of the resources should be created within 5 minutes. However, the certificate will likely remain in CREATE_IN_PROGRESS status for up to an hour. At this time, you can visit each of the resources in AWS Management Console. If we navigate to the Certificate Manager, we will likely see that our domains are Pending validation.

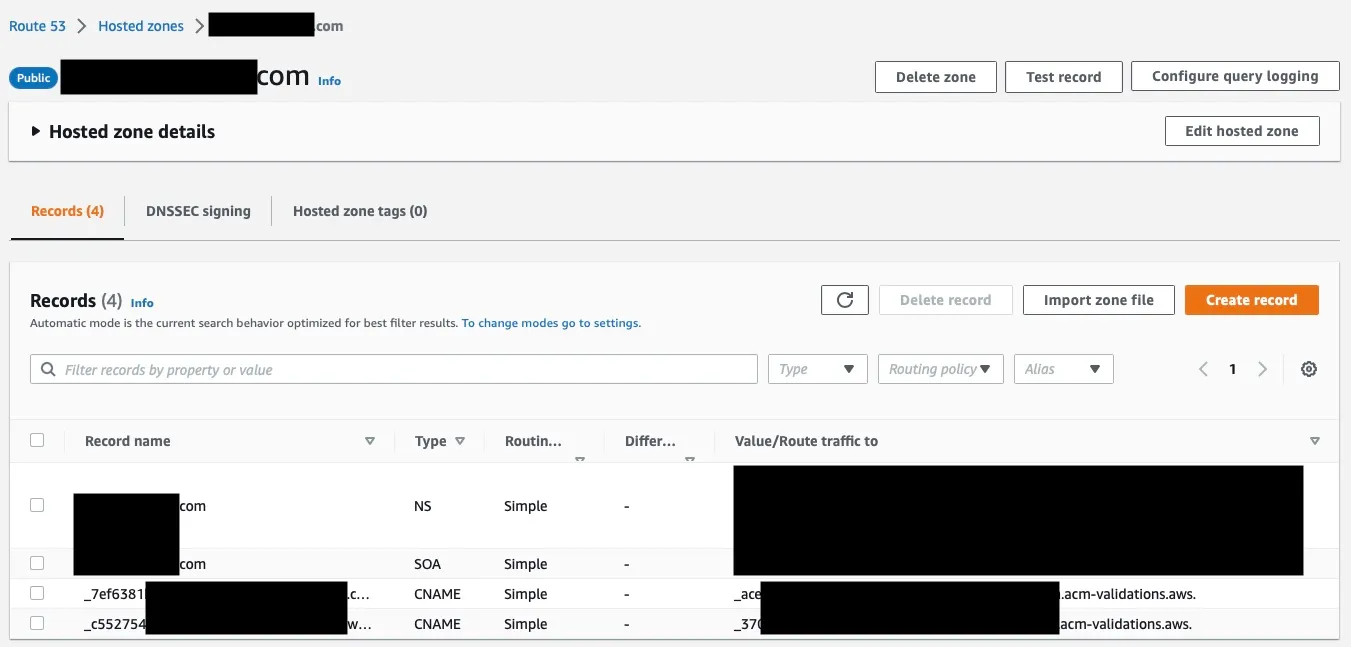
After a couple of minutes, we should see the CNAME records created under our Route 53 Hosted Zone.

Unfortunately, Certificate Manager can take a few hours to validate our domain.
At this point, we can continue with the tutorial. If your DNS servers haven’t updated, you can navigate to your S3 bucket in AWS Management Console, click the Properties tab, scroll to the bottom and copy the Bucket website endpoint URL under the *Static website hosting section. If you navigate to that URL, you’ll receive a 403 Forbidden response. This is expected, as we haven’t deployed our Jekyll files to the bucket yet.
To test, you can upload a file to your S3 bucket. You’ll need to select the file and click on Make public using ACL, under the Actions dropdown. Then click on the Copy URL button and navigate to that page, you should see the contents of your file.
Setting up GitHub Secrets and Actions
In this tutorial, I am assuming you have an IAM user created that will be used for GitHub Actions. In that case, you’ll need to have your AWS Access Key ID and Secret Access Key values. If you don’t, you’ll want to check out one of the following articles to obtain this:
- https://docs.aws.amazon.com/IAM/latest/UserGuide/id_users_create.html
- https://vasko.io/jekyll/aws/2017/08/03/jekyll-s3-cloudfront.html
- https://betterprogramming.pub/build-a-static-website-with-jekyll-and-automatically-deploy-it-to-aws-s3-using-circle-ci-26c1b266e91f
Create GitHub Secrets
Our GitHub Action will need permission to deploy to our S3 bucket and CloudFront distribution. We leverage the AWS Access Key ID and AWS Secret Access Key values to perform this. However, this is not data that we want to commit directly into our git repository or GitHub Actions file.
Navigate to your git repository on GitHub, then the Settings tab, and click on the New repository secret under the Secrets -> Actions option.

You will need to create three secrets.
- Access Key ID
- Name =
AWS_ACCESS_KEY_ID - Value =
Insert your value here.
- Name =
- Secret Access Key
- Name =
AWS_SECRET_ACCESS_KEY - Value =
Insert your value here.
- Name =
- CloudFront Distribution ID
- Name =
CLOUDFRONT_DISTRIBUTION_ID - Value =
Insert your value here.
- Name =
The CLOUDFRONT_DISTRIBUTION_ID can be found directly under the CloudFront Distributions page in AWS Management Console.
We will refer to the names of both secrets in the next step.
Create GitHub Actions
There are three main steps that we’ll need our GitHub Action to perform:
- Build the Jekyll website.
- Sync the files to our S3 bucket.
- Invalidate the cache of our CloudFront distribution.
You likely can find a third-party action in the GitHub Action Marketplace to merge these actions, but I don’t want to introduce another dependency.
Navigate to your git repository on GitHub and click the New Workflow button under the Actions tab.

Go ahead and click the set up a workflow yourself link and paste the following into the file:
name: Deploy Website

on:
  push:
    branches:
      - main

jobs:
  build:
    runs-on: ubuntu-latest
    steps:
    - uses: actions/checkout@v2
    - uses: ruby/setup-ruby@v1
      with:
        ruby-version: '2.7'
    - run: gem install bundler
    - run: bundle install
    - run: bundle exec jekyll build
    - name: Configure AWS Credentials
      uses: aws-actions/configure-aws-credentials@v1
      with:
        aws-access-key-id: ${{ secrets.AWS_ACCESS_KEY_ID }}
        aws-secret-access-key: ${{ secrets.AWS_SECRET_ACCESS_KEY }}
        aws-region: us-east-1
    - name: Deploy to S3
      run: |
        aws s3 sync _site s3://example.com --acl public-read --delete
    - name: Invalidate CloudFront Cache
      run: |
        aws cloudfront create-invalidation --distribution-id ${{ secrets.CLOUDFRONT_DISTRIBUTION_ID }} --paths "/*"
Under the Deploy to S3 task, ensure you update example.com to reflect your domain. Also, update aws-region if you are running in a different region than I am.
Click the Start commit button.
If all was successful, you should see a successful build under the workflow we defined. If a step failed, you can click on the workflow run to find a build log with more details for troubleshooting.

Conclusion
In conclusion, setting up a static website using Jekyll, GitHub Actions, AWS S3, AWS Route 53, AWS Certificate Manager, AWS CloudFront, and AWS CloudFormation can be complex. However, by leveraging AWS CloudFormation to manage the required resources makes it much easier.
At this point, you should have a build pipeline that builds your Jekyll site and deploys it to AWS S3 each time you commit to the main branch. The committed changes to your website should be reflected as the build process completes successfully.
While I didn’t include it in this article, it’s worth noting that we could automate the creation of the IAM users, roles, and policies that are required for the GitHub Action to perform its steps. Additionally, you can modify the GitHub Action to only perform the build and deployment when a pull request is approved.
Lastly, don’t limit yourself to the solution I provided. There are many ways to perform the same outcome, as I’ve demonstrated here. For instance, on one of my client’s projects, I find the build process to be slower than I’d like. Rather than setting up ruby, installing bundler and installing bundles, I found that running a docker container was much quicker for me. This is because the majority of the steps defined in our original GitHub Action are cached in the jekyll/builder image.
steps:
    - uses: actions/checkout@v3
    - name: Build the site in the jekyll/builder container
      run: |
        docker run \
        -v ${{ github.workspace }}:/srv/jekyll -v ${{ github.workspace }}/_site:/srv/jekyll/_site \
        jekyll/builder:latest /bin/bash -c "chmod -R 777 /srv/jekyll && jekyll build --future"
    # ...