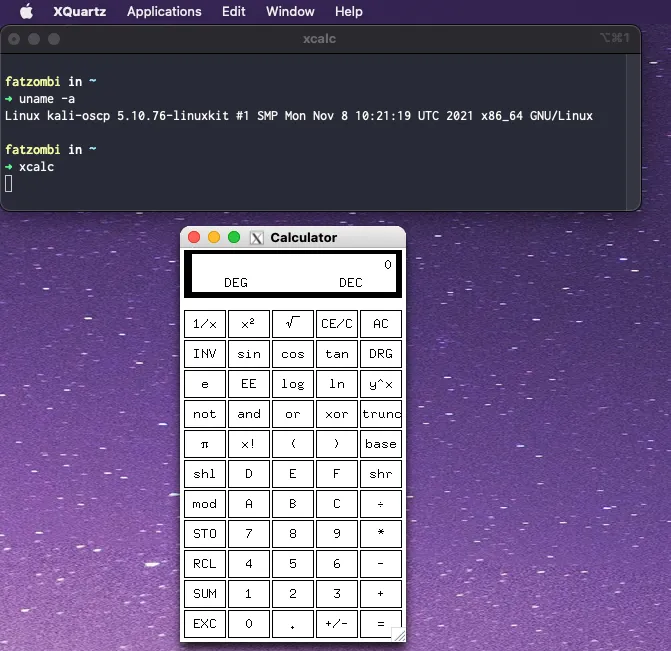
Running Linux on macOS, but why, you say?

My problem
Having been an InfoSec practitioner for several years, I wouldn’t say that I’m set in my ways, but I’ve certainly developed a workflow for security assessments that I’ve grown used to. When I sat down to prepare for the Offensive Security Certified Professional (OSCP) certification, I found their prebuilt VM was greatly hindering that workflow.
Not only were key-bindings problematic between macOS and VMWare Fusion or VirtualBox, but I had no desire to run yet another desktop environment when macOS was perfectly capable. Furthermore, I would have to store a ~60 GB disk image on my MacBook Pro and Time Machine backups, and worry about shared drives and clipboard to make for a seamless experience. Lastly, my documentation process at the time was relying on an application that wasn’t compatible with Linux, which meant I couldn’t do everything inside the Kali VM without changing tools.
At first, I was going to use cloud-init, Terraform, and Ansible for this solution, but that would make more sense if I was creating a VM in my opinion. I use docker, primarily with docker-compose, in my homelab, and recalled X11 Forwarding from my old days of running Gentoo Linux as a daily driver. After some experimentation, I found this solution to be the best for my needs.
Brief roles of products in my solution
Docker
We will use Docker to create an image of Kali Linux which includes any additional tools and configurations that we want.
Docker-Compose
We will use Docker Compose to build our container and configure X11 Forwarding.
XQuartz
We will use XQuartz as an X Window System to display the GUIs running on Kali Linux under our macOS desktop.
Putting it all together
Building our image
First we need to build a docker image containing Kali Linux and additional tools we want, we can create the following Dockerfile to handle that.
# We need to start from somewhere
FROM kalilinux/kali-rolling:latest
ENV DEBIAN_FRONTEND noninteractive

# Bring everything up to date
RUN apt update; apt -y dist-upgrade

# Install whatever we desire
RUN apt-get -y install \
x11-tools \
zsh

# Here you can run additional commands to configure the box
# Create our new user and add it to some groups
RUN useradd -G sudo,video fatzombi -shell /bin/zsh -m
# Create a default password so we can login
RUN echo "fatzombi:fatzombi" | chpasswd

# Clean up packages
RUN apt-get -y autoremove

# Jump to the shell
ENTRYPOINT zsh $@
Running docker build . will create the image for us. If the build fails, you may need to explicitly include additional dependencies for the applications you are installing.

Building a container from our image
Now we could run docker create with arguments, but in my case, I want the configuration to be stored in a docker-compose.yml file that I can commit to version control.
version: "3.7"

services:
  kali:
    build: .
    stdin_open: true # docker run -i
    tty: true        # docker run -t
    container_name: kali
    restart: unless-stopped
    hostname: kali-oscp
    environment:
      - DISPLAY=host.docker.internal:0
      - TERM=xterm-256color
    cap_add:
      - NET_ADMIN
      - SYS_ADMIN
Running docker-compose up -d will attempt to create the container. If successful, you should have a container called kali listed in the output of docker ps.

Don’t mind if your COMMAND and PORTS are different than mine, the important thing is that the container is running.
Entering our new container
Now that our container has been started, we can enter it by running docker exec --user fatzombi --workdir /home/fatzombi/ -it kali /bin/zsh.
Don’t forget to use passwd to change the default password that was defined in the Dockerfile.
Displaying GUIs on macOS
All that’s left to do is start XQuartz on macOS and run the following command in the terminal to inform macOS which display should be used for X11 Forwarding.
DISPLAY=:0 /opt/X11/bin/xhost +
Displaying GUI applications from Kali Linux is now as simple as typing the command of the application in the terminal of the container.

Concluding Thoughts
There are several benefits to this solution:
- Everything I care about can be included in source control, and I don’t need to back up a ~60 GB binary disk image.
- We can streamline our process with Makefiles and shell scripts to increase the efficiency, see further below.
- This solution can be applied to operating systems other than macOS. Additionally, it doesn’t require the Kali container to run locally on macOS, in case you need it to have additional resources.
What else can we do?
Using Makefile to get into the container quicker
Add the following contents into a Makefile:
shell run: open -g /Applications/Utilities/Xquartz.app sleep 2 DISPLAY=:0 /opt/X11/bin/xhost + || TRUE sleep 2 docker start kali docker exec --user fatzombi --workdir /home/fatzombi/ -it kali /bin/zsh
You can now type make in the directory to bring yourself to the container’s shell, or you could place those commands in a shell script and create an alias to quickly enter the environment.
A helpful script might be to perform the image build process, handle the docker-compose and X11 Forwarding steps, and enter the container’s shell.
Mounting volumes from macOS to Kali Linux
By adding the following lines to the docker-compose.yml file, it allows for you to share files between macOS and the Kali container.
volumes:
  - "/Users/fatzombi/Documents:/home/fatzombi/Documents"
Using this technique, you could also share specific dotfiles between macOS and Kali Linux.
Exposing ports
Depending on the assessment, I may find myself forwarding ports from one box to the other. In those situations, it’s helpful to expose ports on the container, which is just as simple as mounting volumes.
ports:
  - 4445:4445:
  - 16001:16001