Picking back up where we left off in Part 1 of our homelab automation series, we now have a cloud-init image that we can use to quickly and easily configure new virtual machines in Proxmox. However, manually creating and configuring each VM can still be a tedious and time-consuming task, especially if you have a lot of them to manage. This is where Terraform comes in.
Overview of Terraform
Terraform is an open-source infrastructure as code tool that allows you to define and manage your infrastructure as code. This code is a declarative language that is simple to write. In this article, we will explore how to use Terraform to automate the creation of VMs in Proxmox, using the previously generated cloud-init image. But before we can do that, we need to set up Proxmox to allow Terraform to authenticate and interact with the API.
Configuring API Users, Permissions, and Tokens in Proxmox
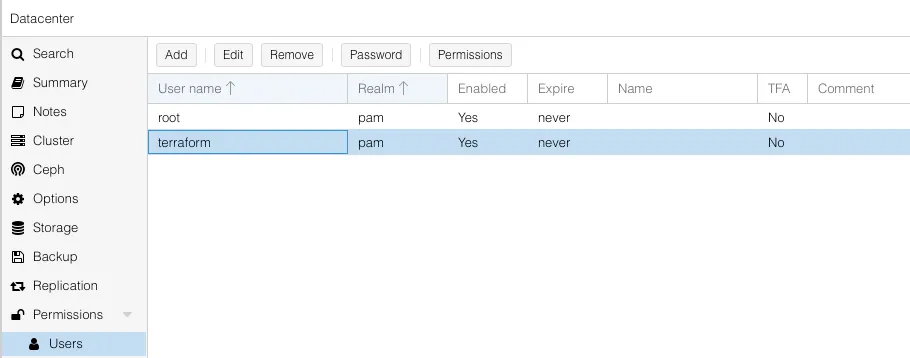
After logging into Proxmox, under the Datacenter menu, click on Users under the Permissions menu. Here, we will click the Add button to configure a new user. Create a PAM standard user with a username and ensure that it’s enabled.

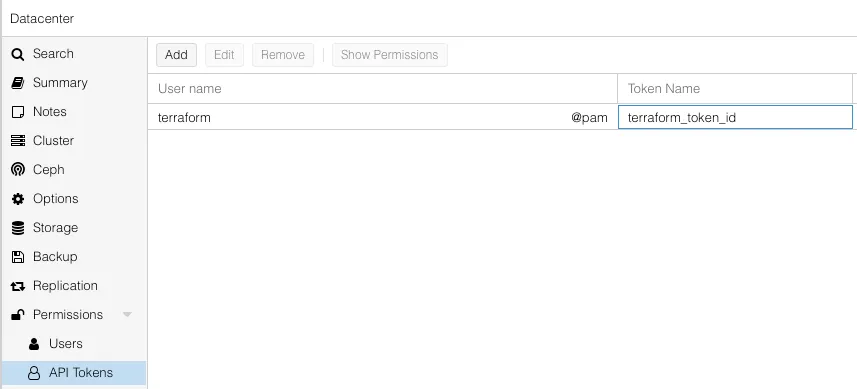
Now, under the same Permissions menu, we want to click on API Tokens. Create a new API Token by selecting the user we just created, ensure that Privilege Separation is enabled, and name the Token ID: terraform_token_id. As you’ll be warned, make sure you copy down the Token Secret, as it will only be displayed once.
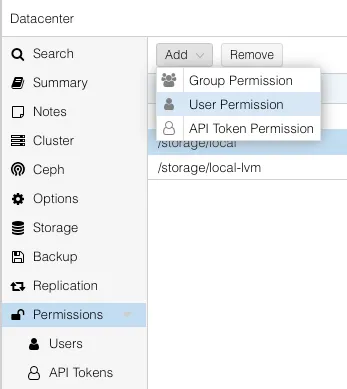
 Now go back up to the Permissions menu, and we’ll add new user permissions by clicking the User Permission menu item from the Add button dropdown.

We’re going to add three, one for the path of /, /storage/local, and /storage/local-lvm. Your paths may vary depending on how your storage is configured. The roles and paths are below.
/                    terraform@pam   PVEVMAdmin
/storage/local       terraform@pam   Administrator
/storage/local-lvm   terraform@pam   Administrator
 Now, Terraform will have access to Proxmox’s API to create the VMs based on our configuration file.
The last thing we need to do on Proxmox’s end is install terraform. It’s not in the official repos for Debian, so we’ll add a new repository and install it onto Proxmox.
# Install terraform
apt install lsb-release
curl -fsSL https://apt.releases.hashicorp.com/gpg | apt-key add -
echo "deb [arch=$(dpkg --print-architecture)] https://apt.releases.hashicorp.com $(lsb_release -cs) main" >> /etc/apt/sources.list.d/terraform.list
apt update && apt install terraform
Creating a Terraform Configuration
For brevity, we’ll only be configuring two virtual machines, but the process is repeatable based on however many VMs you want to host.
If you don’t want to work through these steps manually, you can clone the repository located at https://github.com/fatzombi/terraform-homelab.
We’ll be creating the following directory structure and files:
~/terraform-homelab
    - main.tf
    - vars.tf
    - pihole.tf
    - homebridge.tf
main.tf
This file contains a provider, in this case we’re using the telmate/proxmox provider to interact with the Proxmox API. You won’t have to change anything within this file unless you wish to enable TLS verification.
terraform {
  required_providers {
    proxmox = {
      source = "telmate/proxmox"
      version = "2.7.4"
    }
  }
}

provider "proxmox" {
  pm_api_url = vars.api_url
  pm_api_token_id = var.token_id
  pm_api_token_secret = var.token_secret
  pm_tls_insecure = true # Change to false if you have your
}
vars.tf
This file contains all the variables that are used in main.tf and the respective .tf files for each VM we define. The last variables are for configuring static IP addresses on our VMs, but this step is optional.
variable "ssh_key" {
    default = "ssh-rsa ....."
}
variable "api_url" {
    # The Proxmox Web UI address, with /api2/json added to it.
    default = "https://192.168.1.15:8006/api2/json"
}
variable "proxmox_host" {
    # The name of the Proxmox server listed under Datacenter
    default = "..."
}
variable "template_name" {
  default = "debian-11-cloudinit-template"
}
variable "token_id" {
  default = "terraform@pam!terraform_token_id"
}
variable "token_secret" {
  default = "..." # Enter your API Secret here
}
variable "ipconfig_pihole" {
  default = "ip=192.168.1.16/24,gw=192.168.1.1"
}
variable "ipconfig_homebridge" {
  default = "ip=192.168.1.17/24,gw=192.168.1.1"
}
pihole.tf
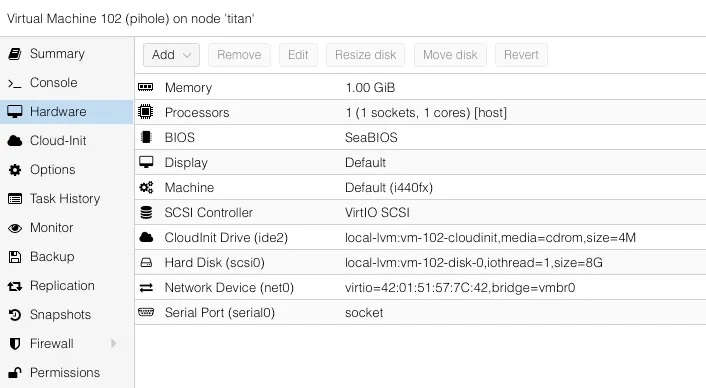
Now we can define the resources allocated to our pihole vm. The primary areas of interest will be cores, sockets, memory, and disk.size.
resource "proxmox_vm_qemu" "pihole" {
  count = 1
  name = "pihole"
  target_node = var.proxmox_host

  clone = var.template_name
  agent = 1
  os_type = "cloud-init"
  cores = 1
  sockets = 1
  cpu = "host"
  memory = 1024
  scsihw = "virtio-scsi-pci"
  bootdisk = "scsi0"
  disk {
    slot = 0
    size = "8G"
    type = "scsi"
    storage = "local-lvm"
    iothread = 1
  }

  network {
    model = "virtio"
    bridge = "vmbr0"
  }

  lifecycle {
    ignore_changes = [
      network,
    ]
  }

  ipconfig0 = var.ipconfig_pihole

  sshkeys = <<EOF
  ${var.ssh_key}
  EOF
}
homebridge.tf
This file will be similar to our pihole.tf; however, there’s an additional section where we pass through a USB device from the host to the VM.
resource "proxmox_vm_qemu" "homebridge" {
  count = 1
  name = "homebridge"
  target_node = var.proxmox_host

  clone = var.template_name
  agent = 1
  os_type = "cloud-init"
  cores = 2
  sockets = 1
  cpu = "host"
  memory = 8192
  scsihw = "virtio-scsi-pci"
  bootdisk = "scsi0"
  disk {
    slot = 0
    size = "50G"
    type = "scsi"
    storage = "local-lvm"
    iothread = 1
  }

  network {
    model = "virtio"
    bridge = "vmbr0"
  }

  lifecycle {
    ignore_changes = [
      network,
    ]
  }

  serial {
    id = 0
    type = "/dev/tty0"
  }

  ipconfig0 = var.ipconfig_homebridge

  sshkeys = <<EOF
  ${var.ssh_key}
  EOF
}
Deploying VMs with Terraform
Now that we have our Terraform configuration, there are only a few more steps we need to take.
terraform initterraform planterraform apply
⠀If everything was successful, you should be able to see your newly created virtual machines in Proxmox. For example, here are the details of our pihole VM.

Conclusion
In this article, we have covered how to configure Proxmox to enable Terraform to automatically create virtual machines based on our previously generated cloud-init image. We started by creating a new user and generating an API token with the appropriate permissions to allow Terraform to interact with our Proxmox instance. We then installed and configured the Proxmox Terraform provider, which allowed us to define our virtual machines as infrastructure-as-code using Terraform. We created a basic Terraform configuration that defined our VMs, its resources, and attached our cloud-init image to it. Finally, we ran the terraform apply command, which created our new virtual machines with the defined specifications.
By using Terraform, we can automate the process of creating virtual machines and ensure consistent configurations across all of our instances. With the Proxmox Terraform provider, we can easily manage our infrastructure as code and make changes in a repeatable, predictable way. In the next article, we will cover how to use Ansible to perform software-related tasks such as installing dependencies for a particular role the VM will offer.